
Introduction
Do you remember when you had to carry a separate camera just to take good pictures? Maybe not, because smartphones have mostly replaced that. But what if your phone’s camera takes blurry pictures? Don’t miss out on capturing the perfect moment because your camera isn’t working well. Keep reading to learn how to fix it easily!
First Steps
Before trying any of the more time-consuming fixes below, start with these simple steps:
- Restart your phone: A quick power off and on can solve many problems.
- Tap the screen: While taking a photo, tap the part of the image where you want the camera to focus. iPhones usually focus well on their own, but giving it a little help can improve the picture.
- Check the right camera: Make sure you’re using the camera you want, whether it’s the front or rear one.
- Close and reopen the camera app: Sometimes the app gets stuck. Restarting it might fix the issue.
- Try the iPhone camera app: If you’re using a different app, check if the picture is clearer with the default iPhone camera app. Third-party apps may not fully use the phone’s camera features.
Causes
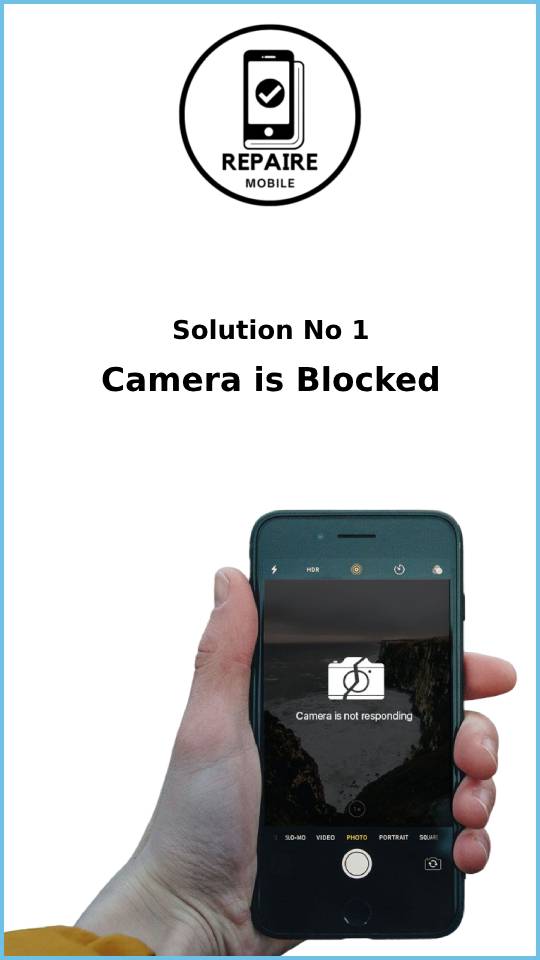
1: Camera is Blocked
For your camera to take clear pictures, it needs an unobstructed view. It’s easy to overlook something blocking the lens—like your finger!
- Clean the camera lens: Use a microfiber cloth to wipe the glass over your cameras. Dust or smudges can cause blurry or dark photos.
- Check your screen protector: If the issue is with the front camera, make sure the screen protector isn’t covering it.
- Look for damage: Inspect the glass over the camera. Even if the camera works, cracked glass can affect image quality. In many cases, this glass can be replaced without needing to change the entire back panel.
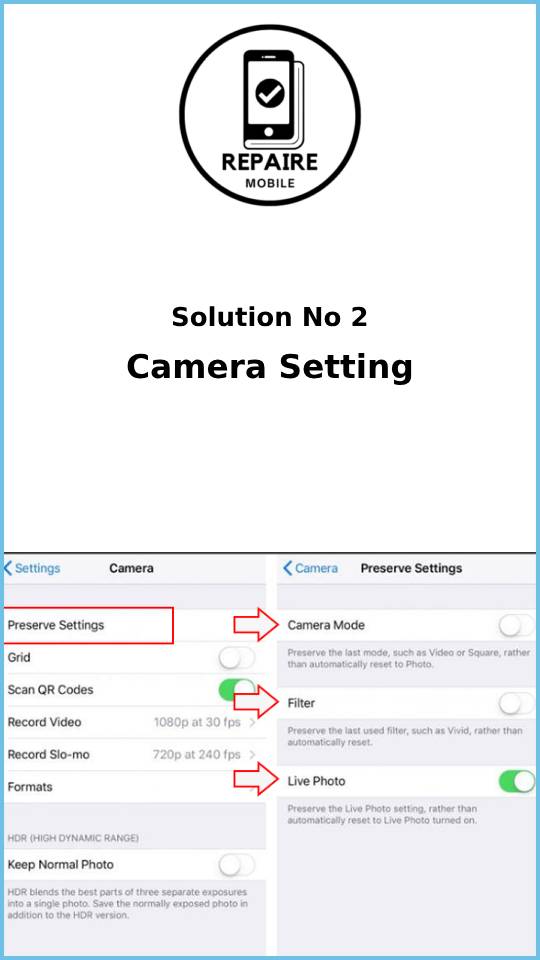
2: Incorrect Camera Settings
With iPhones having multiple camera sensors, figuring out the problem can be a bit trickier.
- Switch between cameras: Make sure you’re using the right camera by tapping the button to switch between the front and rear cameras.
- Check the mode: Make sure you’re using the correct mode for the setting. For example, if you’re not taking a portrait, don’t use Portrait mode, as this can affect how the photo turns out.
3: Buggy Software
Sometimes, software glitches can cause the camera to act up. Before you start taking apart your phone, make sure it’s not a software issue.
- Try another app: Use a different app that has a built-in camera feature.
- Close the problem app: If the camera works in other apps, open the App Switcher, close the app causing trouble, and reopen it.
- Check for updates: If the issue happens again, check the App Store for any updates and install them. If no updates are available, uninstall and reinstall the app.
- Operating System issue: If the camera doesn’t work in any apps, it might be a problem with the operating system. Use a PC or Mac to check for software updates through iTunes or Finder.
- Restore the phone: To completely rule out software issues, back up your data and restore your phone using a computer. This will erase everything, so try testing the phone without restoring your backup first to see if the issue persists.

4: Damaged Optical Image Stabilization
Most iPhone rear cameras use optical image stabilization (OIS) to reduce blur by adjusting for movement. However, frequent exposure to vibrations or a hard drop can damage this system.
- Signs of damage: If your camera looks like it’s constantly shaking or if you can hear or see movement inside, OIS may be broken.
- Fix: The best solution is to replace the rear camera. The OIS system is controlled by tiny electromagnets and circuits, which are hard to repair.
- Avoid DIY magnet fixes: Some suggest using strong magnets to stop the shaking, but this can cause serious damage to other parts of your phone.
- Software issues: YouTuber Luke Miani highlighted a bug with OIS in the iPhone 14 Pro and Pro Max, where third-party apps caused severe vibrations in the camera. This was fixed with a software update. If you haven’t done so, follow the earlier software troubleshooting steps before considering hardware repair.

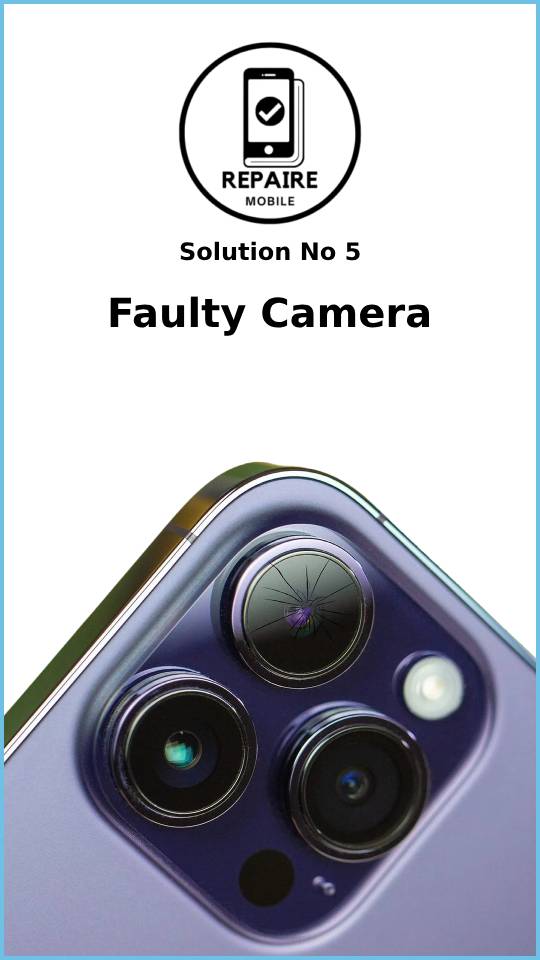
5: Faulty Camera
Camera issues can sometimes stem from faults in the camera hardware itself. A problem with one camera sensor may affect others or the entire photo-taking system.
- Identify the faulty camera: Test both the front and rear cameras, and try different camera modes. Use other apps to see if the issue persists across all of them.
- Replace the faulty camera: If you identify which camera is the problem, replace it or the entire camera assembly. However, be aware that:
- For iPhone 12 and newer models, replacing the camera may trigger a warning about non-genuine parts.
- Replacing the front camera can disable Face ID functionality.
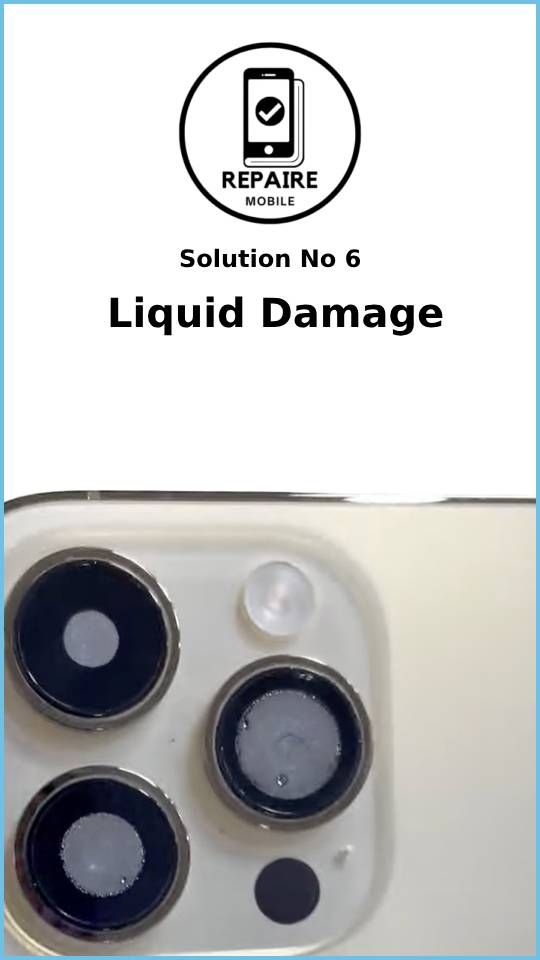
6: Liquid Damage
Many people believe iPhones are waterproof, but that’s not true. Even with improved water resistance, moisture can still get inside.
- Look for condensation: Check the camera lens for signs of moisture, which often collects on the glass covering the camera sensor.
- More serious damage: If you see condensation in the camera, it could mean water has entered other parts of the phone. Skip using rice to dry it out and follow a reliable iPhone Liquid Damage Guide to minimize further damage.
7: Logic Board
The logic board controls most of an iPhone’s functions, including the camera. If parts of the board are damaged, the camera may stop working.
- Causes of damage: Liquid exposure, electrical issues, drops, or even bending from being in your pocket can damage the logic board. Look for signs like a bent board, liquid damage, burns, or loose components.
- Inspect the board: Follow a guide specific to your iPhone model to inspect the logic board. Pay close attention to the camera connectors and the surrounding components.
- Replace the board: For most DIYers, replacing the entire logic board is the best solution for board-related faults.
- Microsoldering: If you’re feeling ambitious, you can repair tiny components on the board through microsoldering, a highly skilled technique. If you’re interested in learning microsoldering, there are plenty of resources to help you get started.